acadon Archive Setup
Use the Global Search, which can be accessed via shortcut Alt + Q or the Search Symbol, filter for doc.box Setup and open the page.
In the following Screenshot you can see the fields necessary to set up acadon Archive Blob Storage for the doc.box:
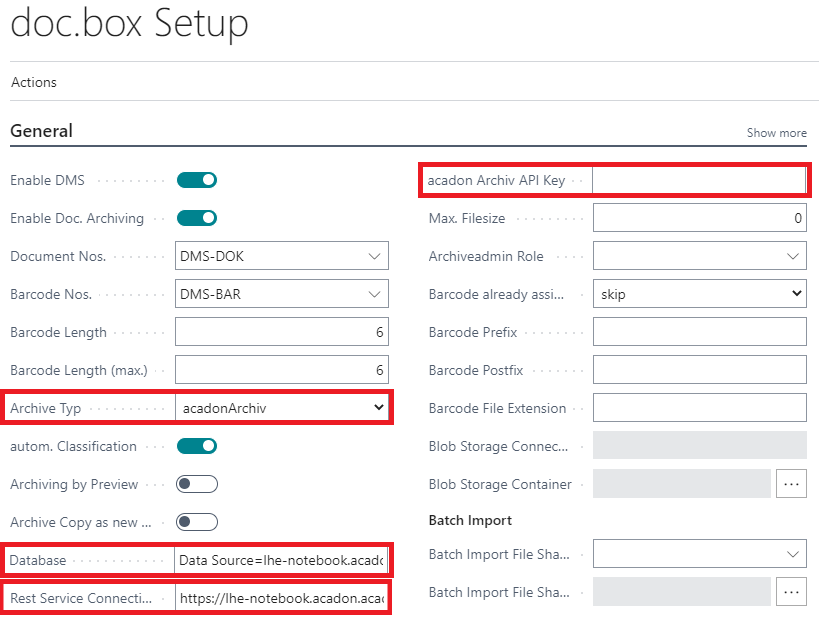
- Archive Type:
Here you can see all the possible storage options for the acadon_doc.box. In the case of a local SQL database, please select acadonArchiv. - Database: Here the Database Connection String should be filled in. It is constructed by simply replacing "databaseLocation" with the location of the local database including domain names (e.g. computername.acadon.acadon.de) and "databaseName" with the name of the local database in the following string: "Data Source=databaseLocation;Initial Catalog=databaseName;"
- Rest Service Connection URL:
Here the base Rest Web Service URL needs to be inserted. This is the URL that leads to the index page of the web service and can be found in the IIS Express Manager. Setting up the Web Service is explained further down - acadon Archiv API Key: Here the API Key used for authorization purposees need to be supplied. When configuring the Web Service you can choose the ApiToken value yourself in the appsettings.json and add it here accordingly. Make sure that you have changed the default value for security reasons.
Setting up the Web Service
There are two possibilities when setting up the web service. In the repository you can find a script that, when run as administrator and supplied with the right parameters installs the service automatically.
Note
You can find the web service files and also the script on the tfile drive: \\tfile\Kunden\acadon_products\acadon_docbox.connector. Also make sure that you change the ApiToken value in the appsettings.json to an individual token for security reasons.
Note
Note that the connector needs the current version of the ASP.NET 6.0.* Hosting Bundle. You can download the setup files from the Microsoft website.
Install Web Service with powershell script
The parameters are described here:
- $Path (Mandatory): Local path to files of the web service.
- $IPAddress (Mandatory): IP Address under which the service should be reachable alternatively just "*" can be used so that every local ip address can be used
- $Hostname (Mandatory): The hostname on which the website is listening on.
- $Port (Optional): The port the service should use when being accessed. Of course a free port should be chosen. Default port is 50169
Install Web Service manually
To deploy the Service on a customer system you have to copy the current connector files from "\\tfile\Kunden\acadon_products\acadon_docbox.connector" to a sub folder in "C:\inetpub\wwwroot". There should be another folder for the Web Client already in this so just add the second folder like "acadon_docbox.connector". Following that you have to open the IIS Management. This can be achieved by opening the Run Window by pressing "Windows Key + R" in the new window you simply have to type "inetmgr" and hit "Enter". The following window should open:

Expand the list on the left side, where the computer name is listed and click on the "Sites" Folder. On the right side the option "Add Website" should be chosen.
The following Dialog opens and should be filled in according to the screenshot.
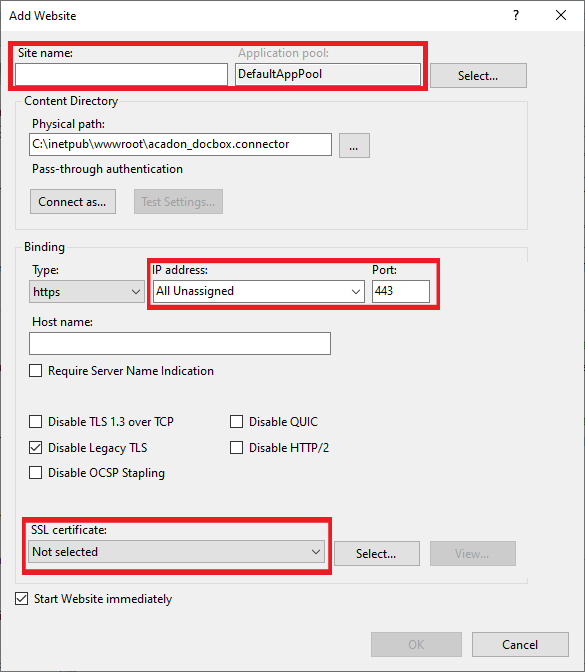
The marked fields should be filled with custom values. They are explained here:
- Sitename: The value doesn't matter but is seen when doing maintenance in the IIS Manager. Our suggestion is to name it like the service: "acadon_docbox.connector"
- Applicationpool: Which pool is chosen is not that important but you have to keep in mind, that when not configuring something else in the DMS User Setup the User that owns the pool has to be added to the local database.
- IP: You can choose an IP Address from the drop down menu, you should chosse an IPv4 address to ensure compatibility. This together with a leading "https://" is also your Rest Service Connection URL note it down good so that you can setup Business Central correct. If left empty every local IP address can be used to connect to the Service and therefore also used to construct the Rest Service Connection URL.
- Port: A port must be chosen that is not currently in use. Ports over 50000 are often viable options.
- SSL Certificate: Here you have to add a valid certificate that ensures trustability between Business Central and the Rest Service.
All other fields should be left untouched.
After that the new Website should be created via the "Ok" button in the bottom. The created website should start and be accessible nearly immediatly. If the setup in Business Central was completed succesfully and the steps for installing the acadon Archiv database have been followed the doc.box should work as expected.
Update the web service to the latest version
Get the latest version from the tfile drive \\tfile\Kunden\acadon_products\acadon_docbox.connector and copy it to the computer where the web service is located.
Open the iis tool and stop the website and application pool.
Replace all files in the website location with the new files. Make sure that you do not overwritte the appsettings.json and Web.config files.
Start the website and the application pool again.
Troubleshooting
The web service does not start
Make sure you installed the latest ASP.NET 6.0.* Hosting Bundle. You can download the setup files from the Microsoft website. In some cases a restart of the computer is needed.
If the website still does not start, look in the Windows Event Viewer for .NET errors and IIS errors. In most cases, IIS will log the problem there and you can fix the problem according to the error message.
How can I test whether the web service is working?
Navigate to the DMS Setup and start the action Test Archiv Connection. This will test the connection from bc to the web service and the connection from the web service to the dms database.
With a tool like Postman you can also check the GET endpoints [web-service-address]/archive/isAvailable or [web-service-address]/archive/connectionCheck manually. Note that you must provide a X-API-KEY in the header with the specified api token as value. If the request was successful, the endpoints return true.
The "Test Archiv Connection" check failed, what can I do?
If the check fails, there are several possible reasons. In most cases, one of the following problems will cause the check to fail.
Firewall issue
If the service and the service tier are on different machines, make sure that the Business Central Service Tier can reach the web service and that the web service's port is open.
Web service certificate is not trusted
Business Central will only allow secure web service invocations with a valid certificate. If you use a self-signed certificate, make sure that the certificate is trusted on the computer where the Business Central service tier is located.
API Token is not correct
Make sure that the api token in the DMS Setup is the same as in the appsettings.json file from the web service.
Database Connection failed
In the DMS Setup you need to specify the database connection string. If you have specified a custom user there, make sure that user has rights to use the dms database. In most cases the connection string is set up to use Windows authentication. In this case, make sure that the user running the web service application pool has permissions to use the dms database.