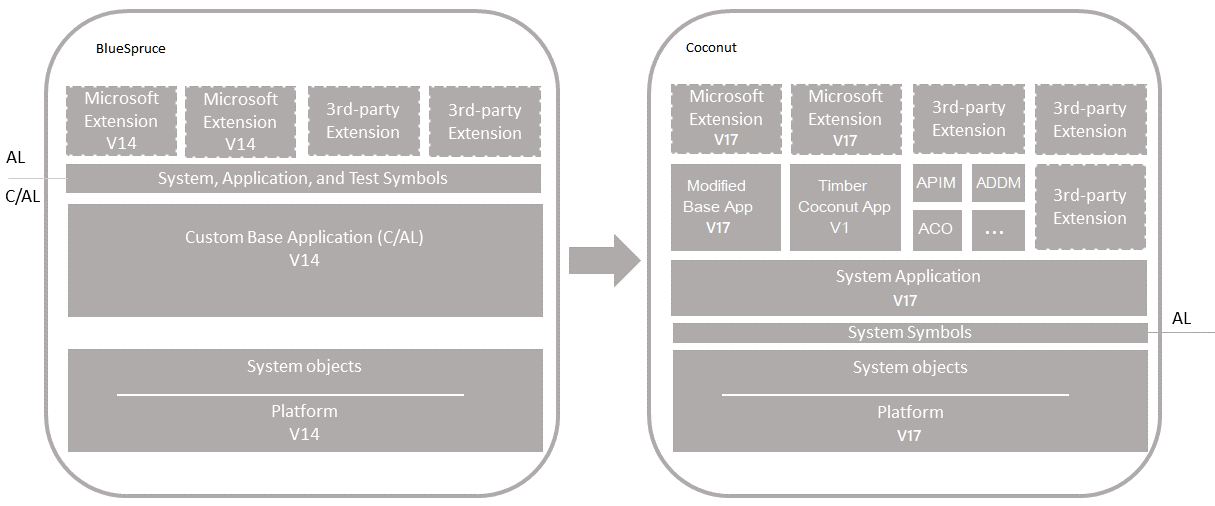
Upgrading from customized BlueSpruce
This article describes how to upgrade a customized BlueSpruce (BC14) to a Dragontree (BC18) solution. This guide is based on the default Microsoft Update Guide, which can be found here. This guide will add some additional information and provide some acadon specific steps. If you are unsure about certain steps, you can also check the Microsoft Documentation.
Upgrade Compatibility
You can upgrade Business Central Spring 2019 (version 14) directly to Business Central 2021 Wave 1 (version 18). It is highly recommended to update to the latest version of BlueSpruce, because the update objects mentioned in this guide are only available for the latest version.
Overview
The upgrade is divided into two sections: Application Upgrade and Data Upgrade. The Application Upgrade section deals with upgrading the application code. For the application upgrade, you'll have to create several extensions. Some of these extensions are only used for upgrade purposes. The Data Upgrade section deals with upgrading the data on tenants - publishing, syncing and installing extensions. For this scenario, the data upgrade consists of two phases for migrating data from the current tables to extension-based tables. The following figure illustrates the upgrade process.
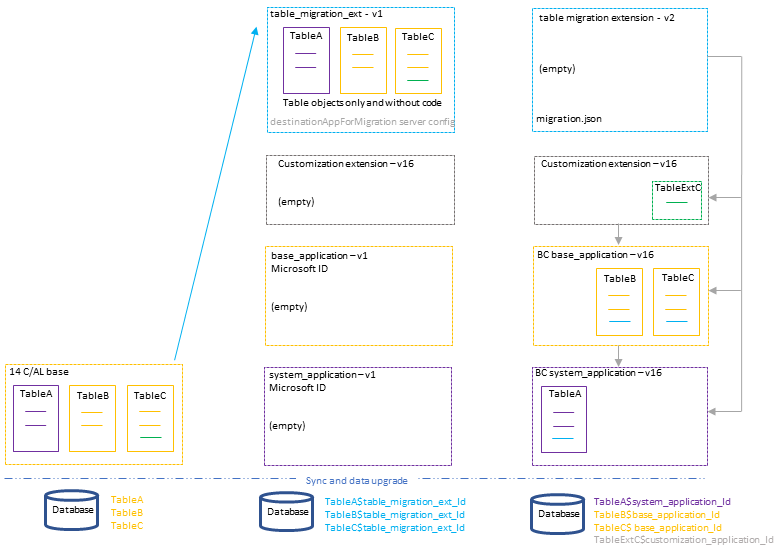
The process uses two special features for migrating tables and data to extensions:
destinationappsformigration server setting
The destinationappsformigration setting is a configuration setting on the Business Central Server. In short, it's used to transfer ownership of the existing tables to the table migration extension. For more information, see DestinationAppsForMigration.
migration.json file
The migration.json file is used to migrate tables and fields from one extension to another. In this case, migration is from the table migration extension to system and base application tables. For more information about the migration.json, see The Migration.json File.
Single-tenant and multitenant deployments
The process for upgrading is similar for a single-tenant and multitenant deployment. However, there are some inherent differences. With a single-tenant deployment, the application and business data are included in the same database. While with a multitenant deployment, application code is in a separate database (the application database) than the business data (tenant). In the procedures that follow, for a single-tenant deployment, consider references to the application database and tenant database as the same database. Steps are marked as Single-tenant only or Multitenant only where applicable.
Prerequisites
- You have to be on version BlueSpruce R2 CU10
- Make sure that the database is synced and has no pending data upgrades
- The required objects can be found on
- tsql\timber -> Database BlueSpruce-DE or BlueSpruce-NL or
- \tfile\Kunden\Branche Holz\14.0\CUs -> Attention: Please check the readme
- All custom changes are already in an app or are prepared in an app for coconut
- Update related Fobs, Apps and Scripts can be found in the following folder
\\tfile\Kunden\Branche Holz\17.0\Upgrade\BlueSpruceToDragontree. The folder will be referenced asUpgradeFolderin the following Sections.
Task 1: Prepare databases
Make a backup of the database
Import Upgrade-Objects with SyncMode Later for the correct version (DE, NL or BE) from the
UpgradeFolder\BlueSpruceUpgradeObjects\14.10:- UpgradeCoconut-Step1-<LOCALIZATION>-HO15.10.001
- This fob is needed to do some required updates of the table structure. It is mandatory to import this before you can continue the update process Attention: if you have additional fields in the changed tables, you have to merge the tables first
- UpgradeCoconut-Step1-<LOCALIZATION>-HO15.10.001
Run Sync with validation.
Run Data Upgrade with mode serial.
Import Coconut Upgrade KillerFob
UpgradeCoconut-Step2-BC170KillerFob.fobwith force.- The file can be found in
UpgradeFolder\BlueSpruceUpgradeObjects\14.10
- The file can be found in
Note
In this step a few update tables are deleted so the force parameter is necessary.
Install version 18
Task 2: Install version 18
Download Business Central 2021 Wave 1 (version 18) in the correct version.
Before you install, it can be useful to create desktop shortcuts to the version 14.0 tools, such as the Business Central Server Administration tool, Business Central Administration Shell, and Dynamics NAV Development Shell because the Start menu items for these tools will be replaced with the new tools.
Install Business Central version 18 components.
You'll have to keep version 14 installed to complete some steps in the upgrade process. When you install version 18, you must either specify different port numbers for components (like the Business Central Server instance and web services) or stop the version 14.0 Business Central Server instance before you run the installation. Otherwise, you'll get an error that the Business Central Server failed to install.
For more information, see Installing Business Central Using Setup.
APPLICATION UPGRADE
This section describes how to upgrade the application code. This work involves creating various extensions.
Task 3: Create table migration extension
In this step, you create an extension that consists only of the non-system table objects from your custom base application. The table objects will only include the properties and field definitions. They won't include AL code on triggers or methods. This extension is an interim extension used only during the upgrade.
You'll create two versions of this extension. The first version contains the table objects. The second version is an empty extension that contains a migrate.json file.
Note
If the database is not modified (All custom changes are already in extensions), you can skip this task and use the provided migration apps in UpgradeFolder\Apps\MigrationApps\<Localization> Migration <Version>
Create the first version
- Start the Dynamics NAV Development Shell (Version 14) and run Export-NAVApplicationObject cmdlet to export only tables from the database.
Export-NAVApplicationObject -DatabaseServer .\BCDEMO -DatabaseName "Demo Database BC (14-0)" -ExportToNewSyntax -Path "C:\export2al\bc14tablesonly\exportedbc14-tables.txt" -Filter 'Type=Table;Id=1..1999999999'
- Use the txt2al conversion tool to convert the exported tables to the AL syntax. Use the --tableDataOnly parameter to include table and field definitions only.
txt2al --source=C:\export2al\bc14tablesonly --target=C:\export2al\bc14tablesonly\al --tableDataOnly
Note
The --tableDataOnly Parameter is only available in the txt2al from the latest BC15 CU's. Tested with version BC15 CU9. You can download the dvd or artifacts from Microsoft or use the provided Txt2Al in UpgradeFolder\Txt2AL folder
- In Visual Studio Code, create an AL project for table migration extension using the al:go command.
Set the target platform to 6.0 Business Central 2020 release wave 2.
- Configure the project's app.json file:
- Set the "name", "publisher", and "version". You can use any valid name.
- Set the "target" to "On-prem".
- Set the "idRanges" to cover the table object IDs.
- Clear the "dependencies".
- Remove the application property
- Create an .alpackages folder in the root folder of the project and then copy the system (platform) symbols extension (System.app file) to the folder.
The System.app file is located where you installed the AL Development Environment. By default, the folder path is C:\Program Files (x86)\Microsoft Dynamics 365 Business Central\180\AL Development Environment. This package contains the symbols for all the system tables and codeunits. Alternatively you can use the system.app from the dvd or artifacts located under "\ModernDev\program files\Microsoft Dynamics NAV\180\AL Development Environment\System.app"
Add the AL files that you converted to the project.
Build the extension package for the first version.
To build the extension package, press Ctrl+Shift+B. This step creates an .app file for your extension. The file name has the format
There are most likely some errors that you have to fix in order to compile the app. These are from converting C/AL to AL. Just resolve the errors, but leave table structure the same. If you are not sure how to solve them or want to verify the app.json structure, you can have a look at Create a migration.json file and add it to the project's root folder. In the migration.json, include rules for the Microsoft base application, system application, coconut/PIM/ADDM/ACO application, and your customization extensions. In the example code: 63ca2fa4-4f03-4f2b-a480-172fef340d3f identifies the system application extension Delete the AL objects. Increase the version in the app.json file. Build the extension package for the second version. You can have a look at the second version for an unmodified Database at Create two empty extensions: one for the Microsoft base application and another for the System Application. The only file in the extension project that is required is an app.json. You can create the extension like any other extension by adding an AL project in Visual Studio Code. Also, create an empty extension for each new customization extension. After you create the project, modify the app.json file. The important settings in the app.json file id, name, and version. The id and name must match the value used by Microsoft's extensions. Set the version to any version lower than 18.0.0.0. Remove all other settings. It's important that there are no dependencies set. You also need to set the runtime to any value equal or lower 6.0 otherwise you will get some errors due the publishing of the empty apps. For the timber apps, you can skip this task and use the provided empty apps in Examples: Build and compile the extension package. This step is only required if to trigger a data upgrade on these extensions when you run Start-NavAppDataUpgrade on these extensions later. Running the data upgrade will automatically install them. You can skip this step, then manually run Install-NavApp instead. If the current server instance uses data encryption, disable it. You can enable it again after upgrading. Instead of disabling encryption, you can export the current encryption key, which you'll then import after the upgrade. However, we recommend disabling encryption before upgrading. Start Business Central Administration Shell for version 14 as an administrator. (Single-tenant only) Uninstall all extensions from the tenants. To uninstall an extension, you use the Uninstall-NAVApp cmdlet. For example, you can uninstall all extensions with a single command: Get-NAVAppInfo -ServerInstance If dependencies errors occur, rerun the command multiple times, until all extensions are uninstalled. To unpublish an extension, use the Unpublish-NAVApp cmdlet. For example, you can unpublish all extensions by using a single command: Get-NAVAppInfo -ServerInstance If dependencies errors occur, rerun the command multiple times, until all extensions are unpublished. To unpublish symbols, use the Unpublish-NAVAPP cmdlet with the -SymbolsOnly switch. Get-NAVAppInfo -ServerInstance To dismount a tenant, use the Dismount-NAVTenant cmdlet: Dismount-NAVTenant -ServerInstance Stop-NAVServerInstance -ServerInstance This task runs a technical upgrade on the application database. The task converts the database from the version 14 platform to the version 18 platform. The conversion updates the system tables of the database to the new schema (data structure). It provides the latest platform features and performance enhancements. Start Business Central Administration Shell for version 18 as an administrator. Run the Invoke-NAVApplicationDatabaseConversion cmdlet to start the conversion: Invoke-NAVApplicationDatabaseConversion -DatabaseServer When completed, a message like the following displays in the console: In this step, you configure the version 18 server instance. In particular, you configure it to migrate the table migration extension that you created earlier. The migration is controlled by the DestinationAppsForMigration setting for the server instance. For more information about the DestinationAppsForMigration setting, see DestinationAppsForMigration. Set-NAVServerConfiguration -ServerInstance In a single-tenant deployment, this command will mount the tenant automatically. You'll need the ID, name, and publisher for the table migration extension that you created in Task 3. Set-NAVServerConfiguration -ServerInstance Set-NavServerConfiguration -ServerInstance Be sure to re-enable task scheduler after upgrade if needed. Restart-NAVServerInstance -ServerInstance Import the version 18 partner license. To import the license, use the Import-NAVServerLicense cmdlet: Import-NAVServerLicense -ServerInstance Restart the server instance. This task is optional, but it's recommended. You can choose to skip it for now and do it later. In this task, you'll increase the application_version that's stored in $ndo$dbproperty table of the application database. The application version isn't changed automatically. To change the application version, run the Set-NAVApplication cmdlet: Set-NAVApplication -ServerInstance For example: Set-NAVApplication -ServerInstance BC -ApplicationVersion 18.2.26490.0 -Force
To restart the server instance you can use the Restart-NAVServerInstance cmdlet.
Restart-NAVServerInstance -ServerInstance In this task, you'll publish the platform symbols and the extensions configured as DestinationAppsForMigration. Publish-NAVApp -ServerInstance This step publishes the extensions you created in Task 4. Publish the extensions using the Publish-NAVApp, like in the previous steps. Except if the extensions aren't signed, use the -SkipVerification switch parameter. In this task, you'll synchronize the tenant's database schema with any schema changes in the application database and extensions. If you have a multitenant deployment, do these steps for each tenant. To mount the tenant, use the Mount-NAVTenant cmdlet: Mount-NAVTenant -ServerInstance You must use the same tenant ID for the tenant that was used in the old deployment; otherwise you'll get an error when mounting or syncing the tenant. If you want to use a different ID for the tenant, you can either use the -AlternateId parameter now or after upgrading, dismount the tenant, then mount it again using the new ID and the OverwriteTenantIdInDatabase parameter. For the upgrade, we recommend that you use the -AllowAppDatabaseWrite parameter. After upgrade, you can dismount and mount the tenant again without the parameter if needed. At this stage, the tenant state is OperationalWithSyncPending. Use the Sync-NAVTenant cmdlet: Sync-NAVTenant -ServerInstance With a single-tenant deployment, you can omit the -Tenant parameter and value. Use the Sync-NAVApp cmdlet: Sync-NAVApp -ServerInstance This step creates empty tables in the database for the table objects defined in the table migration extension. When completed, the table migration extension takes ownership of the table. In SQL Server, you'll notice that the table names will be suffixed with the extension ID. At this point, the tenant state is OperationalDataUpgradePending. In this task, you run a data upgrade on tables to handle data changes made by platform and extensions. The step installs table migration extension. It moves data from the old tables to the new tables owned by the table migration extension. Start-NAVDataUpgrade -ServerInstance You only need to use the -SkipAppVersionCheck if you didn't increase the application version in Task 5. This will automatically install the table migration extension. Restart-NAVServerInstance -ServerInstance To install the extension, you use the Install-NAVApp cmdlet. Install-NAVApp -ServerInstance This step starts the second phase of the data upgrade. You'll publish the second version of the table migration extension and the production versions of extensions. The final extensions for Timber can be found at Publish extensions in the following order: The second version of the table migration extension Synchronize the newly published extensions in the following order: Microsoft System Application Synchronize extensions in the order of dependencies. The migration extension must be synchronized last. This step will change table ownership to the system and base application. Run data upgrade on the table migration extension. For example: Start-NAVAppDataUpgrade -ServerInstance The final step is to upgrade to the new extension versions in the following order: Uninstall the table migration extension. Enable task scheduler on the server instance. (Multitenant only) For tenants other than the tenant that you use for administration purposes, if you mounted the tenants using the -AllowAppDatabaseWrite parameter, dismount the tenants, then mount them again without using the -AllowAppDatabaseWrite parameter. If you want to use data encryption as before, enable it. Optionally, if you exported the encryption key instead of disabling encryption earlier, import the encryption key file to enable encryption. Version 18 introduces system permission that protects these two actions. The permission is granted by the system object 6110 Allow Action Export To Excel. Because of this change, users who had permission to these actions before upgrading will lose permission. To grant permission again, do one of the following steps: For more information about working with permission sets and permissions, see Export and Import Permission Sets.Note
UpgradeFolder\Apps\MigrationApps\<Localization>\MigrationV1.zipCreate the second version
{
    "apprules": [
        {
            "id": "63ca2fa4-4f03-4f2b-a480-172fef340d3f"
        },
        {
            "id": "437dbf0e-84ff-417a-965d-ed2bb9650972"
        },
        {
            "id": "e3907796-b6d8-445b-b701-b734363c0190"
        },
        {
            "id": "e3907796-b6d8-445b-b701-b734363c0195"
        },
        {
            "id": "b0539a8a-139a-41b3-bc9c-ac1d3280b1f8"
        },
        {
            "id": "04fbab1d-8f81-46e2-a6ff-689cb43c6c13"
        },
        {
            "id": "YOUR EXTENSION ID"
        }
    ]
}
437dbf0e-84ff-417a-965d-ed2bb9650972 identifies the base application extension
e3907796-b6d8-445b-b701-b734363c0190 identifies the coconut application extension
e3907796-b6d8-445b-b701-b734363c0195 identifies the acadon_PIM application extension
b0539a8a-139a-41b3-bc9c-ac1d3280b1f8 identifies the acadon_ADDM application extension
04fbab1d-8f81-46e2-a6ff-689cb43c6c13 identifies the acadon_aco application extension
Note
UpgradeFolder\Apps\MigrationApps\<Localization>\MigrationV2.zipTask 4: Create empty extensions System, Base, and customization extensions
Note
UpgradeFolder\Apps\EmptyApps. If you are moving customer changes to an app, this is necessary.System Application
  "id": "63ca2fa4-4f03-4f2b-a480-172fef340d3f",
  "name": "System Application",
  "version": "14.0.0.0",
  "runtime": "6.0"
Base Application
  "id": "437dbf0e-84ff-417a-965d-ed2bb9650972",
  "name": "Base Application",
  "version": "14.0.0.0",
  "runtime": "6.0"
Coconut Application
  "id": "e3907796-b6d8-445b-b701-b734363c0190",
  "name": "Timber",
  "version": "0.0.0.1",
  "runtime": "6.0"
PIM Application
  "id": "e3907796-b6d8-445b-b701-b734363c0195",
  "name": "acadon_PIM",
  "version": "0.0.0.1",
  "runtime": "6.0"
ACO Application
  "id": "04fbab1d-8f81-46e2-a6ff-689cb43c6c13",
  "name": "acadon_aco",
  "version": "0.0.0.1",
  "runtime": "6.0"
ADDM Application
  "id": "b0539a8a-139a-41b3-bc9c-ac1d3280b1f8",
  "name": "acadon_ADDM",
  "version": "0.0.0.1",
  "runtime": "6.0"
Tip
DATA UPGRADE
Task 5 Prepare Database
<server instance name> -Tenant <tenant ID> | % { Uninstall-NAVApp -ServerInstance <server instance name> -Tenant <tenant ID> -Name $_.Name -Version $_.Version -Force}
<BC14 server instance> | % { Unpublish-NAVApp -ServerInstance <BC14 server instance> -Name $_.Name -Version $_.Version }
<BC14 server instance> -SymbolsOnly | % { Unpublish-NAVApp -ServerInstance <BC14 server instance> -Name $_.Name -Version $_.Version }
What are symbols?
<server instance name> -Tenant <tenant ID>
<server instance name>Task 6: Convert version 14 database
<database server name>\<database server instance> -DatabaseName "<database name>"
DatabaseServer      : .\BCDEMO
DatabaseName        : Demo Database BC (14-0)
DatabaseCredentials :
DatabaseLocation    :
Collation           :
Task 7: Configure version 18 server for DestinationAppsForMigration
<server instance name> -KeyName DatabaseName -KeyValue "<database name>"
<server instance name> -KeyName "DestinationAppsForMigration" -KeyValue '[{"appId":"<table migration extension>", "name":"<table migration extension>", "publisher": "<publisher>"}]'
<server instance name> -KeyName "EnableTaskScheduler" -KeyValue false
<server instance name>Task 8: Import License
<server instance name> -LicenseFile <path>Task 9: Increase application version
<server instance name> -ApplicationVersion <new application version> -Force
<B18 server>Task 10: Publish symbols and DestinationAppsForMigrations
<server instance name> -Path "<path to extension .app file>"
Task 11: Synchronize tenant
<server instance name> -DatabaseName <database name> -DatabaseServer <database server>\<database instance> -Tenant <tenant ID> -AllowAppDatabaseWriteImportant
Note
<server instance name> -Mode Sync -Tenant <tenant ID>
<server instance name> -Tenant <tenant ID> -Name "<table migration extension>" -Version <extension version>
Task 12: Install DestinationAppsForMigration and move tables
<server instance name> -Tenant <tenant ID> -FunctionExecutionMode Serial [-SkipAppVersionCheck]
<B18 server>
<BC18 server instance> -Name "<name>" -Version <extension version>
Task 13: Publish final extensions
\\tfile\Kunden\Branche Holz\17.0\Apps. The system application can be found on the dvd or in the artifacts at Applications\system application\source
Microsoft System Application
Microsoft Base Application
Timber Application
acadon_PIM Application
acadon_aco Application
acadon_ADDM Application
Customization extensions
Microsoft and third-party extensionsTask 14: Synchronize final extensions
Microsoft Base Application
Timber Application
acadon_PIM Application
acadon_aco Application
acadon_ADDM Application
Microsoft and third-party extensions
Customization extensions
The second version of the table migration extensionImportant
Task 15: Upgrade on table migration extension
<server instance> -Name "<tablemigration extension>" -version <version 2>Task 16: Upgrade final extensions
Post-upgrade tasks